Table of Contents

Capture Frames
Digital image acquisition takes place during the Capture Frames
Task. The user is first asked to supply descriptive information
for the session. Next, the TREES system requests the user to specify
where images should be captured from a sample which has been mounted
on the stage. The user specifies the beginning and ending points
on the sample, and the TREES system begins acquiring images automatically.
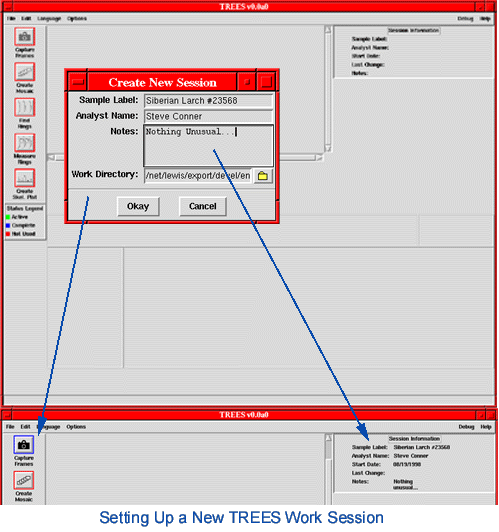
Create a New Session
After completing the Mechanical Set-up and starting the TREES program on the workstation, click File -> New from the main menu.
- Fill in information in the Create New Session form window as required.
Session Information should be meaningful to you.
- Define a new work directory to store your session data. (This
directory should either (1) not already exist, or (2) contain
no files).
- You are next presented with the Image Capture Control Screen:
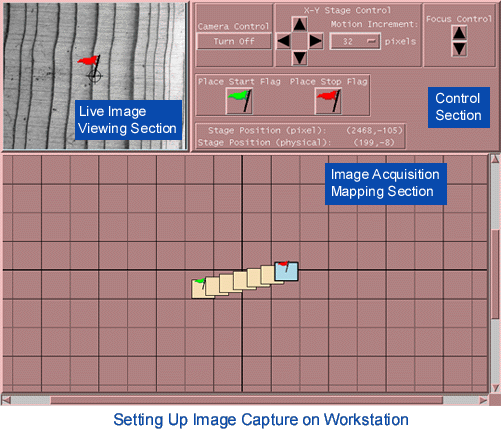
The Image Capture Control Screen consists of three (3) sections:
- Control Section - This section provides the controls (buttons, pull-down menus,
etc.) to specify where image acquisition is to take place on the
sample.
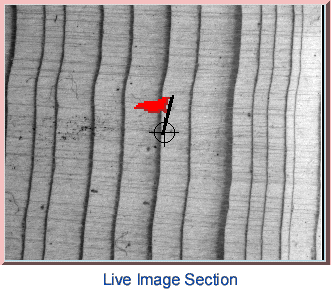
- Live Image Viewing Section - This section provides a live image of the current position
on the sample as viewed through the microscope.
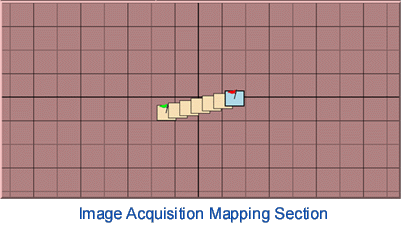
- Image Acquisition Mapping Section - This section provides a graphic overview of the starting position
on the sample (green flag), the ending position on the sample
(red flag), and the number of frames required to capture your
required image.
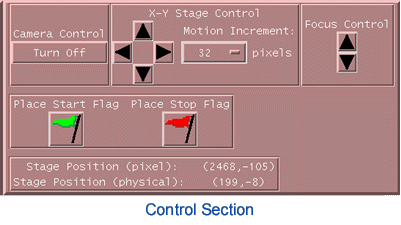
Control Section
Activities associated with capturing image frames will take place
through the Control Section. The Control Section consists of the
following elements:
- Camera Control - This button turns the camera 'on' or 'off'. The camera's current
status is indicated within the button.
- X-Y Stage Control - These control buttons provide for moving the sample stage under
the camera. Clicking an arrow button moves the stage in the direction
of the arrow. The Motion Increment pull-down menu indicates how
many pixels to move each time an arrow is clicked. Values for
Motion Increment include: 32, 512, 1024, and 4096. 1024 pixels
is approximately one frame.
- Place Flags - The 'Place Start Flag' and 'Place End Flag' are used to indicate
where to start capturing image frames and where to end capturing
image frames. The starting and ending positions are marked by
clicking and holding the left mouse button on the appropriate
flag in the control section and dragging (hold down the left mouse
button while moving the mouse) to the starting or ending position
on the Live Image Viewing Section.
- Positional Information - Stage Position (Physical) is the number of pixels (x,y) the
stage is currently versus where it was when the system was turned
on. Stage Position (Pixels) is the number of pixels (x,y) the
stage is currently versus where you placed the Start Flag.
To complete the image frame capture task:
- Click the arrow buttons with the left mouse button to move the
stage to where you wish to start taking images. The position is
viewed in the Live Image Viewing Section.
- Click the (green) Start Flag with the left mouse button and move
the pointer to the specific starting position on the Live Image
Viewer. Clicking the left mouse button again places the flag at
the current location in the Live Image Viewer. In case the flag
is not at the required position, repeat this procedure to place
the start flag in the correct position.
- Use the X-Y Stage Control Arrow Buttons again to move the stage
to where you wish to end taking images. As before, you may view
the sample in the Live Image Viewer.
- Click the (red) End Flag with the left mouse button and move the
pointer to the specific ending position on the Live Image Viewer.
Clicking the left mouse button again places the flag at the current
location in the Live Image Viewer. In case the flag is not at
the required position, repeat this procedure to place the end
flag in the correct position.
- For correct system operation, the (green) Start Flag must be placed
to the left of the (red) End Flag. The path between the flags
should be mostly horizontal. The (green) Start Flag should be
near the center of the sample and the (red) End Flag should be
towards the bark. The system is optimized for rings to be mostly
vertical along the image acquisition path.
- You may view the relative positions of the starting and ending
frames in the Image Acquisition Mapping Section. The current frame
is always indicated in light blue. Once the starting position
is selected the frame is marked with the (green) start flag. Once
the ending position is selected the ending frame is then marked
with the (red) ending flag - and - the positions of intermediate
frames are automatically calculated by the program and displayed
in the Image Acquisition Mapping Viewer.
- Once the starting and ending positions are set, you are ready
to capture images. You will see a dialog box indicating that "[xx]
frames will be captured, Do you wish to capture?". Answering 'Yes'
begins the automatic frame capture sequence. Progress is indicated
in the Image Acquisition Mapping section by observing the position
of the frame with the 'blue' background.
- When frame capture is complete you will be returned to the main
screen. The Capture Frames icon will now be outlined in blue indicating
that the Capture task is complete. You will be asked if you wish
to continue to the Create Mosaic task. Answering 'Yes' will begin the Mosaicing process automatically.
If you answer 'No' , you will be shown a File->Save dialog and asked if you want to save the results of the current
session.
Next Section - Create Mosaic
Previous Section - Main Screen Overview
Last Updated: May 1999
University of Arizona
Questions and Comments: trees@ece.arizona.edu
Digital Image Analysis Laboratory and
Laboratory for Tree Ring Research © 1999