
This guide will take you through some examples in order to guide you through Dymola. For detailed information about the program, you are referred to the on-line documentation and users manuals. The on-line documentation is available in the Help menu after selecting Documentation.
Start Dymola with Modelica language. Four windows appear:
Simulating a model industrial robot
This first example will show how to browse an existing model, simulate it and look at the results. If you want to learn the basics first, you can skip to a smaller example in the next section "Solving a non-linear differential equation".
We will study a model of an industrial robot. To view the robot model, use the File/Demos menu of the model window Unnamed and select Robot.

A window like below (except for the pop-up menu) will then show the top level structure, i.e. an icon for the robot and for each joint a reference signal generator implemented as a table block.

To view the internals of the robot model, select the icon (red handles appear, see above) and press the right button on the mouse. From the menu, choose View Class. A window like below will then show the robot, i.e. an icon for the mechanics and for each joint, an associated drive line and control system.

To view the mechanic structure, select the icon and choose View Class as above. A new window as shown below will show how the robot model consists of connected joints and masses.

Double click on, for example, R1 at the bottom which is a revolute joint.
Note that it has a parameter Real n[3] which is the axis of rotation. The value
for this revolute joint is {0, 1, 0}, i.e. the axis of rotation is vertical.
Push the Info button to learn more about this model. An HTML browser is opened
to show the documentation of the Revolute joint. By double clicking on the other
components, you can, for example, see what parameters a mass has. A single click
on a submodel will display the name and class of the submodel, plus non-default
parameters, in the status bar at the bottom of the window.
To view the drive train, select axis1 of the top level window, click the right button and select View Class as shown below.

The controller and drive train has angular accelerations as reference signals of the joint. Two integrators are used to form angular velocity and angle. These signals are connected to the control system that generates the current references for the motor which drives the gearbox.
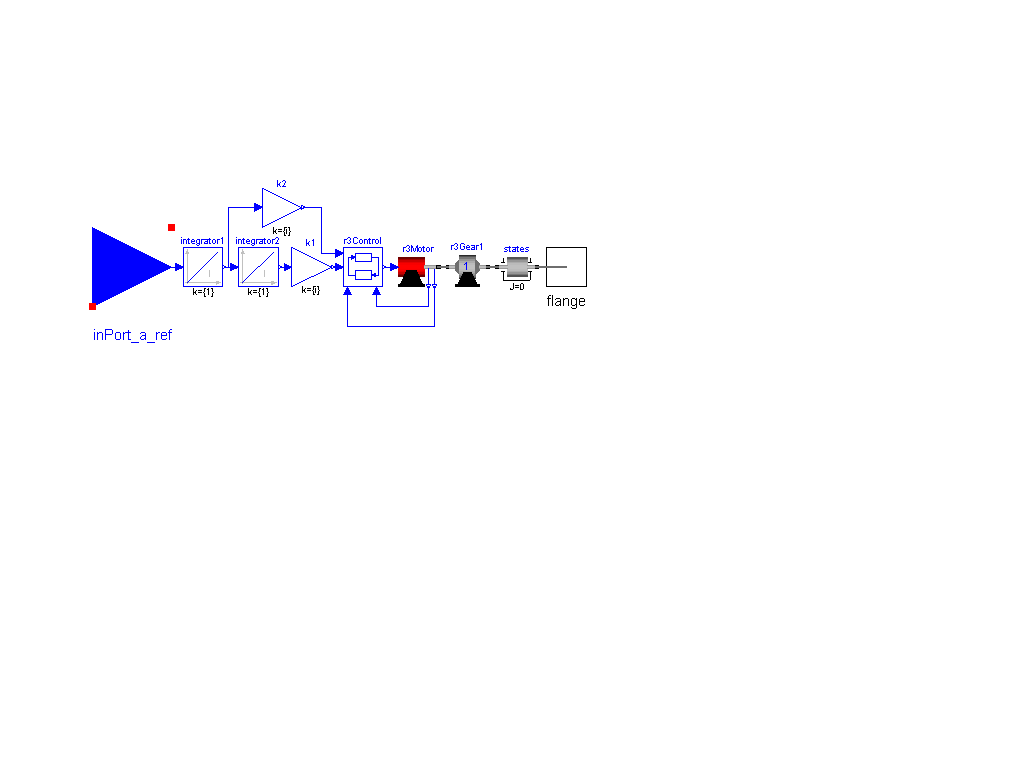
View the class of r3Gear1 in a similar way as for the other classes. It shows the gearbox and the model of friction of the bearings and elasticity of the shafts.

The r3motor model below consists of the electromotorical force, three operational amplifiers, resistors, inductors and sensors for the feedback loop.

The control system, r3control, takes measurements of angle and angular velocity from the motor and corresponding reference signals and produces the reference current for the motor.

Simulation
To prepare a model for simulation, it needs to be translated by selecting File / Translate in the top-most window of the model. The simulation is then controlled from the Dymola main window.
In this case, however, a command script has been prepared. To run it, select File / Run Script in the main window or push the leftmost button

and select r3.mos. Dymola then translates the model, simulates and plot automatically.
To view the animation of the robot, open the iconized animation window.
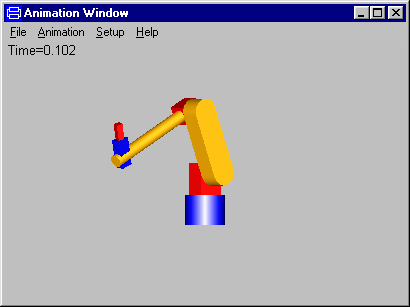
Start the animation by selecting Animation / Run or using key F3. F4 is used to suspend animation, F5 and F6 to step forward and backward respectively. It is possible to change the viewing position by opening a view controller, Setup / 3D View Control.
The command also specified plotting of certain variables. Open the iconized
plot window. It shows the applied torque at the first and second joints.

Other demo examples
Other demo examples can be found under the Files / Demos menu. After
selecting an example, it can be simulated by running a corresponding script file
as was done for the robot example.
Solving a non-linear differential equation
This example will show how to define a simple model given by an ordinary differential equation. We will simulate a planar mathematical pendulum as shown in the figure.
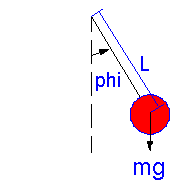
where m is the mass, L the distance from the support to the center of mass. Let us assume that the string is flexible, inextensible and massless, and further, let us neglect the resistance of the air and assume the gravitational field to be constant with g as the acceleration of gravity. The equation of motion for the pendulum is given by the torque balance around the origin as
J* der(w) = - m* g* sin(phi)
where J is the moment of inertia with respect to origin. The variable w is the angular velocity and der(w) denotes the time derivative of w, i.e., the angular acceleration. Assuming a point mass gives
J = m* L2
For the angular position we have
der(phi) = w
Start Dymola or if it is already started then give the command File / Clear All in the model window.
Go to the model window. It has the title "Unnamed". A model has different layers that can be edited. To specify a behavior directly in terms of equations, the Equation Layer has to be edited. To display the equation layer either select the menu View/Equation or press the fourth button.

The title of the model window then changes from "Unnamed (diagram)" to "Unnamed (equation)" and the fourth button is pressed down. The model window is now also divided into two subwindows, where declarations of parameters and variables are given in the top subwindow and the equations in the bottom subwindow.
To declare the parameters and the variables, click in the top subwindow, and
enter as shown

the declarations for the parameters m, L and g, which also are given default values. The parameter J is bound in terms of other parameters. Finally, the time varying variables phi and w are declared. A start value is given for phi, while w is implicitly given a start value of zero. The equations are entered in the bottom subwindow.
The model is ready to be saved. Select File / Save . When prompted for name of class, answer, for example: pendulum. Save the model, for example, as pendulum.mo in a working directory.
Translate the model by the File / Translate command of the model window.
Now turn your attention to the Dymola main window. Click on the Specify
Simulation Run button

Set the stop time to 10 seconds

Click on OK.
Finally, click on the Perform Simulation button to run the experiment.

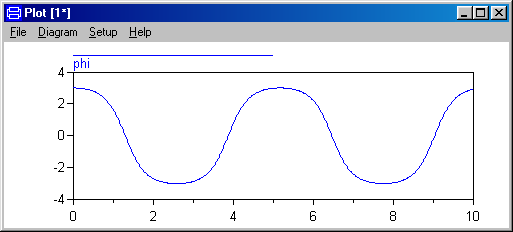
When the simulation is finished, open the plot window, click on Diagram/Plot

to get a list of all stored variables and select phi.
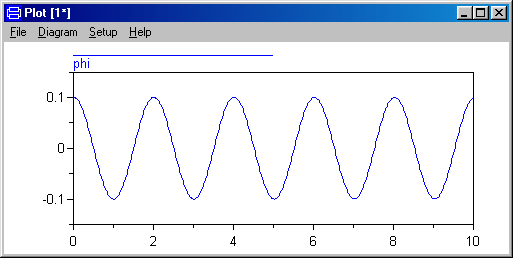
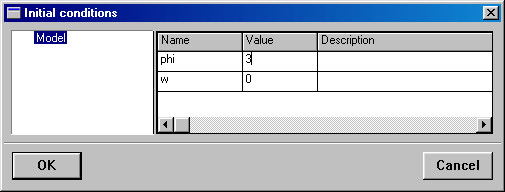
Let us study a swing pendulum with larger amplitude and let it start in
almost top position with phi = 3. It is easy to change initial conditions. Go to
the main window and click on the Initial Condition button.

To set a new initial condition for phi , click in the value field of phi and
enter the new value 3.
Click on OK. Click on the Perform Simulation button to run a simulation and
plot the resulting phi.
Values of parameters are changed in a similar way. Click on the Modify
Parameter Values button to present a list of the model parameters.

Using Modelica Standard Library
In this example, we will show how a model is built up using components from the Modelica Standard Library. The task is to model a motor drive with an electric DC motor, gearbox, load and controller.

As when building a real system, there are several approaches. One extreme approach is to build the system from scratch. However, it is often a difficult and time-consuming task. Another approach is to investigate if the system already is available on the market or if there is some product that easily can be adapted or modified. If not, build the system from components available when possible and develop only when necessary.
The idea of object-oriented modeling is to support easy and flexible reuse of
model knowledge. Modelica has been designed to support reuse of model components
as parts in different models and to support easy adaptation of model components
to make them describe similar physical components. The design of Modelica has
also been accompanied by the development of model libraries.
Modelica Standard Library
We will now have a look at the Modelica Standard Library to see what is available and how we access the model components and their documentation. To open the library, select File/Libraries in a model window and a submenu is popped up.

The first choice is the Modelica Standard Library. It is hierarchically
structured into sublibraries. The menu gives direct access to some of the
sublibraries. We will need components from various sublibraries, so as a
starting point select Modelica Standard Library to open a library window for it.
The window is titled Modelica.

To get documentation for the entire Modelica Standard Library, place the cursor inside the library window, but not on any of the icons and press the right mouse button and select Info.
Your web browser is directed to an html file, which contains documentation for Modelica. This documentation has been generated automatically from the Modelica description of the library. There are basic information such as the content of the library, conventions and conditions for use.
To open the Modelica.Mechanics library, double click on its icon in the
Modelica window. The following window will be shown.

To get documentation on Modelica.Mechanics, you can either use the right mouse button menu in the library window of Modelica.Mechanics or on its icon in the Modelica Standard library window.
Open Modelica.Mechanics.Rotational to find model components for rotating elements and gearboxes, which are useful for our modeling of the electrical motor drive.

The Info for Modelica.Mechanics.Rotational contains important information on design principles behind the library and a list of components. A quick scan of the list indicates that the model Inertia may be of interest for us.
Double click on the icon for Inertia and the parameter window is popped up in read-only mode. It contains some information, but it is of more interest later on, when we use the Inertia as a component in our model. To get documentation for the model, select Inertia and press the right mouse button and select Info.

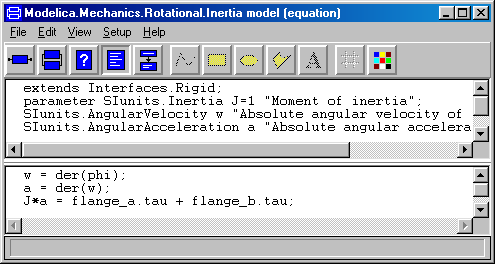
To get a model window for Inertia, select its icon in the library window and once again press the right mouse button and select View class and a model window for the model Inertia is created. Switch to the equation layer, where you find Eulers equation as the last equation.
To sum up, a library window is opened by double clicking on its icon, while double clicking on a model component opens the parameter window. The right mouse button menu alternative "View class" opens a model window. The alternative "Info" directs your web browser to documentation.
It should be noted that multiple openings of a library window by use of the File/Libraries command or by double clicking a library icon does not create multiple library windows. Thus if you need to open a library window for a sublibrary you can always start by selecting File/Libraries and double click the way down.
After this short summary of how to access model components and documentation
of a library, we will continue by actually building a model for an electric dc
motor. This task will give more experience.
Creating a library for the components
developed
It is a good idea to insert developed components into a library. It is good
way to keep track of components and it supports also the drag and drop feature,
when you will use the models as components. Let us collect all developed
components in a library called DriveLib. To create a window for it, go to a
model window, for example that named "Unnamed" and select File/New/Package and a
menu is created.

Enter DriveLib as the new name of the package and click OK. An empty library
window titled DriveLib is created.
Creating a model for an electric dc motor

A model of the complexity indicated above will be developed for the electric dc motor. For simplicity the voltage supply is included in the motor model. The model includes an ideal controlled voltage source. The electric part of the motor model includes armature resistance and armature inductance. The electromotive force, emf, transforms electrical energy into rotational mechanical energy. The mechanical part includes the mechanical inertia of the motor.
Let us start building the motor model. Select in the library window of
DriveLib File/New/Model. Enter Motor as name of the new model. The slot Insert
in package is already filled out with DriveLib, because the model was created
from the library window of DriveLib. Click on OK.

The model window now contains an empty Motor model. Note that a library
window for package DriveLib has obtained an icon for the model Motor.

We will now start building the motor model. To make it easier to follow the
instructions, the result is displayed below:

We need a model component for a resistor. It can be found in
Modelica.Electrical.Analog.Basic. If you do not have a library window for it
then open one.

Here are model components for resistors, inductors etc

Select SignalVoltage and drag it to the model window of Motor. Name it Vs. Let Vs be selected and use Edit/Rotate 90 to turn the signal input, Vs.inPort, from a top position to a left position. SignalVoltage produces between its two electrical pins, p and n, a voltage difference, p.v-n.p, that is equal to the signal input. Get the Info for SignalVoltage displayed in your web browser (point on the icon and use the right mouse button menu). The documentation shows that SignalVoltage extends the model Modelica.Electrical.Analog.Interfaces.OnePort. Click on that link. The documentation shows that the pin p is a filled blue square. To get the proper sign we would like to have pin p in the top position. To flip the component, use Edit/Flip Vertical.
A rotating inertia component is to be found in Modelica.Mechanics.Rotational. Open a window for it. Select the inertia component and drag it over. Name it Jm and set the inertia parameter, J, to 0.01.
Now all model components are in place. Components are connected by drawing lines between connectors. To connect the resistor to the inductor, point at the right connector of the resistor (the small white square) and drag to the left connector of the inductor. The resistor and the inductor are now connected and the graphical result is a line between them. When connecting the voltage source and the resistor, break the line by clicking at an intermediate point. There is a possibility to obtain automatic Manhattanize of connections. Select the connection, press right mouse button and select Manhattanize. The Setup Options has a mode switch for this feature. Draw all connections. Note that we could have drawn a connection between two components as soon as we have the components and we have not to wait until all model components are in place.
Finally, we have to introduce a signal connector for the voltage control and a flange connector corresponding to the shaft of the motor so the motor can be connected to an environment. We would like to place the icon of the connectors at the border of the grid of the drawing pane, because the icon of a model component also includes the connectors. The connector inPort must be compatible with the connector of Vs.inPort. There is a simple automatic to get a connector inPort that is a clone of Vs.inPort. Start drawing a connection from Vs.inPort and go to the left until you reach the border of the grid. Then you double click and select Create Connector from the menu popped up. The connector flange_b is created in a similar way.
Click on the icon layer button (the left-most button in the toolbar) to find
that you also there can se icons for the connectors. When being in the icon
layer, draw an icon. One icon is shown below. To draw it, open the Palette
window by clicking on the palette icon (the right-most button on the toolbar).
Start by drawing the big red cylinder (shaded rectangle); Click the Draw
rectangle button (yellow rectangle) and lay out a rectangle. Go to the palette,
click on red line color, red fill color and the second shading. Draw the rest of
the parts using draw rectangle or draw closed polygon in an analogous way. To
enter the text, click the Write a text button (the button labeled A) and lay out
a rectangle that is as long as the cylinder and two grid squares high. In the
window prompt for the string enter %name. The %-sign has the magic function that
when the model is used, the actual component name will be displayed.

We have now edited the icon layer and the diagram layer. To enter documentation, click the Edit description and documentation button

Enter a short description in the top window and a longer documentation in the bottom window.
We have now created the model. Save it.
Documentation in HTML form is generated by going to the library window of
DriveLib and selecting Export HTML. The documentation for DriveLib and its
components can then be accessed in the usual way through the right mouse botton
menu of DriveLib and its icons.
Testing the model
It is possible to check the model for syntactic and semantic errors. Select File/Check. Hopefully your model will pass the check and you will get a message in the main window saying that the model is a
DAE with 39 unknown scalars and 38 scalar equations
The connector inPort defines the voltage reference and we have not defined that. This freedom explains why there is one equation too few.
It is important to test all models carefully, because that eliminates tedious
debugging later on. Open a new model window for a model, which we call TestMotor
(Go to a model window and select File/New/Model) and insert it into DriveLib. It
is good practice to keep test models. Drag over a Motor component from DriveLib
to TestMotor. We need a source for the signal input to the motor. Signal sources
are to be found in Modelica.Blocks.Sources. Open it

Drag, for example, over Step to the model window and connect it to the motor.

To simulate, select File/Translate in the model window of TestMotor. Go to
Dymola main window and click on the Perform Simulation button to run the
experiment.
To inspect the result, go to the plot window and select Diagram/Plot to get
the Variables menu. Select Motor1.flange_b.phi.

First, we may establish that a positive input signal, makes angular position
increase. The plot looks almost like a straight line. However, there are some
wriggles in the beginning. Zoom in; use the mouse to stretch a rectangle over
that portion of the curve you would like to see. We may also plot the angular
velocity Motor1.Jm.w

There is an oscillation which dies out and the velocity becomes constant.
There is much to be done to validate the model. However, model validation is out
of the scope for this introduction to Dymola.
Creating a model for the motor drive
The task was to build a model for a motor drive and it ought now to be a simple task to complete the model. We will just give a few hints.

To generate the position error, you may use the model component Modelica.Blocks.Math.Feedback. For the controller, there is Modelica.Blocks.Continuous.PID
For the meaning of ratio for the gearbox model, please, consult Info for the model. Set ratio to 100 as indicated. It means that the motor load rotates 100 times slower than the DC motor. The library Modelica.Mechanics.Rotational.Sensors contains a sensor for angles.
To test the model MotorDrive for normal operation, we need to define a reference for the position. This can be done in different ways. A simple approach is to add a signal source directly to MotorDrive. However, we may like to use MotorDrive also for other purposes. If we would like to use the drive as a component we could add a connector for the reference as we did for the electric dc motor model. However, here we will take the opportunity to show another useful way, namely use of extends. We will develop a new class, say MotorDriveTest, which extends MotorDrive. Go to a model window. Select File/New/Model. Enter MotorDriveTest as the name of the model and in the slot for extends enter MotorDrive and insert it into DriveLib. The result is a model window, where the diagram layer looks exactly like that of MotorDrive. However, the components cannot be edited. Try to move or delete a component. It has no effect. Drag over a component Step from Modelica.Blocks.Sources and connect it. Save the model.
A model can be used for different tasks. One is tuning the controller manually. Translate the model MotorDriveTest. The PID controller has four parameters: k, Ti, Td and Nd. There are many ways to tune a PID controller. One is to disable the integrator part by setting a large vale for Ti, say 1000 here. Disable also the derivative part by setting Td small, say 0.001. Simulate for 10 seconds. The step response for k = 1 is very slow. Increase it to find out what happens. All commands are echoed in Dymola main window. When you set k to 10 then the command
controller.k := 10;
is echoed. By using the up arrow and down arrow bottons on your keyboard you
can get these old commands displayed on the command line. Since the command line
can be edited, we have here a quick way of changing a parameter value. We leave
the problem of tuning the controller to the interested reader.
Parameter propagation
Modelica supports parameter propagation, which means that a parameter can be expressed in terms of others. Assume that the load is a homogeneous cylinder rotating long its axis and we would to have its mass, m, and radius, r, as primary parameters on the top level. The inertia is
J = 0.5 mr2
We need to declare m and r in MotorDrive. Open a model window for MotorDrive. Activate the equation layer and enter in the top window declarations for the two parameters as shown.

The parameters are more than real numbers. They are physical quantities. The
Modelica standard library provides type declarations for many physical
quantities. Open a library window for it and double click on the icon for
SIunits.

Active the diagram layer. Move the cursor above the load icon and press the right mouse button and select Parameters.

Click in the value field of J and enter the expression for J. Click OK. The model window now displays the expression for the load inertia.

Translate MotorDriveTest. Go to the Dymola main window and click on the Modify parameter values button

The parameters r and m can now be set. Note that load is not displayed in the
component tree to the left, because load.J is no longer a parameter that can be
set interactively between simulation runs.
We will now develop a more complex model, a 3D mechanical model of a pendulum called a Furuta pendulum. It has an arm rotating in a horizontal plane with a single or double pendulum attached to it, see below.

Start Dymola. Open the Multibody Systems library from the File/Libraries menu. You will then get the following window.

To build the Furuta pendulum, you will need to use the Parts and Joints
sublibraries. Open them by double-clicking.


From the Unnamed window, select File/New/Model and give the name Furuta.
The first step in building an MBS model is to define an inertial system. Drag the Parts.InertialSystem icon onto the Furuta window. (Enable the grid to make alignments easier.) The default parameters need not be changed.
We then need a revolute joint. Drag the model Joints.Revolute onto the Furuta window and name it R1. Select Edit/Rotate 90. This just changes the appearance of the icon. The axis of rotation is set as the parameter n. Set n={0, 1, 0} which means a vertical axis of rotation. Connect the connector of the inertial frame to the bottom connector of the revolute joint.
A bar is then connected to the revolute joint. There is one bar which has a the visual appearance of a box during animation, called BoxBody in the Parts library. Make a BoxBody component and call it B1 and set the vector r between the two ends of the body to {1, 0, 0}. The width and height will be 0.1 by default.
From this bar, we connect another revolute joint having a horizontal axis of rotation, r={1, 0, 0} and a BoxBody (rotated - 90), with r={0, - 1, 0}.
To get a double pendulum, create another similar joint and another BoxBody and connect them. This is accomplished easily by selecting the last revolute joint, the last body and their connection by dragging a selection rectangle, and choosing Edit/Duplicate. Reposition the duplicated components and connect the two sections from box to joint.
To get nicer animation, you can set different colors for the bars, for
example Material = {0, 1, 0, 0.5} and {0, 0, 1, 0.5} respectively for a green
bar B2 and a blue B3. You should now have arrived at a model that is similar to
the following.

Translate the model. Modify initial conditions from the x0 dialogue, say R2.q=3. Set StopTime=5 and simulate. View the pendulum in the animation window; you may want to adjust the perspective by using Setup/3D View Control. Change parameters and study the different behavior.
Try to control the pendulum in such a way as to get a stable upright position. (A trick is to use a "mechanical PD controller", i.e. a spring and damper attached between the tip of the second bar and to a high position.)